Download the Map edition full size.
##############################################################################
Here is a BOM Updated 04/05/2016
- Of course you need to have a 3d printer.
- 2x arduino Mega=80 euros ebay.(The default is 1xUno and 1x Mega, but the legs and waist are yet to come )

Screw Allen countersunk:
- M3x20MM about 50.
- M4x20MM about 50
- M8x100MM about 15

Phillips Flat-Head Wood Screws:
- M3x12MM, about 100 for small servos.
- M4x20MM, about 50 for big servos.
- Plus some small screws for the eye mechanism, the jaw machanism and to fix the pistons on the small servos. But I used the screws that were delivered with the servos.
Hands and forarms(Left, right):
- 10x servos HK15298B=180 euros Hobbyking
- 2x servos MG996r=22 euros ebay for the rotational wrist
- 0,8mm braided /fishing line. 200LB= 10 euros ebay
- Miscealenous Bolts= 10 euros hardware store
- 1500gr natural ABS= 70 euros orbi-tech get 4kg if you start printing
- 10x extension spring 0.51mm diameter, 1cm length(13/64″x13/16″)
Arms and shoulders(Left, right):
- 8 Hitec HS805BB=240 euros ebay (better get even stronger in torque and faster)
- Miscealenous Bolts= 10 euros hardware store
- 1500gr black, yellow, natural ABS= 56 euros orbi-tech
Head and torso:
- 2x Hitec HS805BB HEAD (up/down, right/left)
- 1x servos HK15298B JAW MECHANISM
- 2x servos HK15298B NECK TILTING(1 Master, 1 slave)
- 2x Servo DS929hvCorona or similar EYE MECHANISM
- 1X Camera Hercules HD (dismantled for this purpose)
- or 1X LifeCam3000 Microsoft
- 1X OAK-D-Lite(fixed focus)
- About 4kg natural ABS
- 0,8mm braided thread/fishing line 200LB= 5 euros hardware store or ebay
- Miscealenous Bolts= 10 euros hardware store
- 1500gr natural ABS= 70 euros orbi-tech
- 1x Battery 6V12AH + battery charger 6V1.5A: 35 euros (The robot requires only one battery to work, and the charger should keep the battery topped up during use.) Alternatively when running the whole day, I’m currently using a 6V 60Amps Switching Power Supply. Here is a link for a 5V 50Amps in which you can increase the voltage to 6V:https://fr.aliexpress.com/item/4000663608614.html?gatewayAdapt=glo2fra https://fr.aliexpress.com/item/32713328144.html?gatewayAdapt=glo2fra https://www.amazon.com/ALITOVE-Transformer-Converter-Security-Computer/dp/B06XK3X3PW?th=1
- 2x Mini PC speaker 8Ohm 10W
- Mini amplifier 6V
- 1xPIR sensor retriggered
- Cables and wires
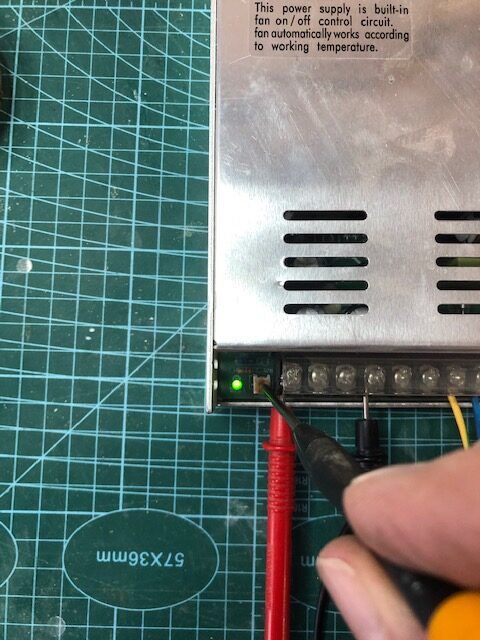
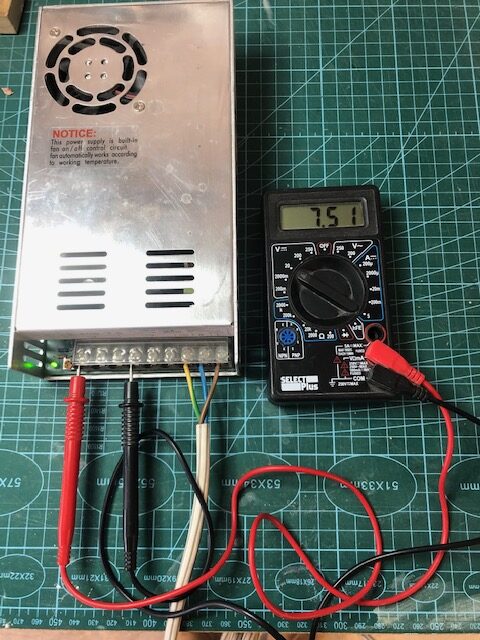
If you cannot find a 6V50Amps on the internet, you can get a 5V50Amps power supply with a adjustable switch to increase the voltage to 6V for your servo motors.
In the exemple below I am adjusting my 5V to a voltage of 7.5V.

Stomach:
- High stomach: 2x Hitec HS805BB
- Mid stomach: 2x Hitec HS805BB or HK15338
Ribbon cable length:
- Nervo board to neck——————————— ribbon length 10cm
- Nervo board to head (Eyes/Jaw)—————- ribbon length 55cm
- Nervo board to Arm————————————– ribbon length 75cm
- Nervo board to hand————————————- ribbon length 90cm
- Nervo board to fingersensors————————- ribbon length 120cm
- Nervo board to stomach————————— ribbon length 30cm
Latest Configuration with NUC:
- CPU: 8th Gen Intel i7 8550 Quad Core 4,0ghz
- SSD: 256GB (OS + Myrobotlab)
- HDD:500GB ( just because I had a spare hard drive)
- RAM: 32GB
- Graphic: Intel UHD Graphics 620
- Connectivity: HDMI, Mini-DP, Gigabit Lan, 2*USB3.0, 2*USB2.0,
- WIFI & Bluetooth: 2.4G/5G Wifi B/G/N/AC+bluetooth
- Size: 113mmx108mmx30mm
- OS installed: Windows 10 pro and Linux Ubuntu
- Tablet Lenovo connected as screen via hotspot to control wirelessly the PC (Tablet model Thinkpad8 2GB RAM, 128GB ssd, Processor 1,46Ghz)
Connected devices controled by MRL:
- 1x USB3.0 Hub 8 ports
- 1x OAK D-Lite (fixed focus) not yet fully supported in MRL
- 2x Arduino Mega
- 2x Nervo Boards
- 1x Arduino Nano
- 3x NeoPixel
- 2x HC-SRC04 sensors
- 1x PIR sensor
- 10x finger pressure sensors
- 2x Hercules webcam
- 1x USB sound card
- 1x Logitech H600 headset wireless
- 2x loud speaker 10watt
- 1x power supply 6V 60Amps which can be replaced by a 6V12AH battery pack
Older configuration:
Using a Lenovo Touchpad 8″ tablet with a 8port Hub powered by a Powerbank 10000mAh 5V. The Tablet runs either under Windows8 or 10, and can be configured to run with Linux. It is a true mini PC. You will need a OTG+Charging special cable for this Lenovo Tablet. I had a hard time to find it, which is very strange. Carefull other similar Tablet brands cable will not work.
https://www.amazon.com/Keyboard-TOUCHPAD-EXECUTIVE-Bluetooth-Detachable/dp/B017HLXESO
I was expecting to be able to use the case for travelling but unfortunately there is a serious issue with the size. Although the seller pretends to sale cases that fit 8″ tablet it is truly impossible to fit the tablet.
So you are advised about the issue…
Beside that the keyboard works fine, with sometimes a loss of connection but it automatically reconnects anyway.
The PowerBank+8 port HUB USB3.0 powers through USB:
- the tablet Lenovo
- the Arduinos
- the cameras
- the sound amplifier
- Kinect
I purchased a 8 port HUB USB3.0 to have extra ports and it works fine with the OTG cable and the Lenovo Tablet. If you do not use the powerbank, it’s important for to power the hub to have a supply that can deliver at least 5v4Amps, because we hook many USB devices that require each 500mAh.
Substitute possible tablets but not tested:
- Venue 8 Pro 5000 (5855) (Should fit according to the specs size, the OTG cable(Charge+Data transfer) is not possible to find according to some users)
- Jumper EZpad Mini3 Windows 10 8.0 inch 2GB/32GB (no need for otg+charge because of seperate charge and USB3.0) Should fit in the back of the robot.
- Insignia™ – 8″ – Tablet – 32GB (Some builders reported this tablet to be junk)
- KOCASO 8 Inch Windows 10 HD Tablet PC Computer (Too small, will need a printed adapter)
- Chuwi Hi8 Pro 8″IPS Windows10 (Should fit according to the specs size)
- NUVISION, Full HD 1920X1200 IPS Signature Edition tablet. 8″(Too small, will need a printed adapter)
Kinect 360 battery powered with 10 AA rechargeable batteries of 1,2v 2500mAh.
#############################################################################
After many tests with the OdroidU3 and the Raspi2, I came to the conclusion that the Arm processor were too slow to obtain a correct FPS value from the cameras, which lead me to go for another option.
This is abandoned:
- 1x Mini Touchscreen display : (Displays/7_17_78_cm_Display_
Set_mit_Touchscreen_LS_7T_ )HDMI_DVI_VGA_CVBS - 1x Odroid U3: (ODROID_U3_
Einplatinen_Computer_Cortex_ )A9_QuadCore_2_GB.html - Installing Ubuntu on SD card for Odroid: procedure to flash s/w release
- 1x Odroid U3 batteries: (ODROID_U3_
ODROID_UPS_USV_LiIon_3_Ah.html )re
- 1x Mini bluetouth keyboard: (Mini_Bluetooth_Keyboard_mit_
Touchpad_DAYCOM_BTK_260T ) - 1x emmc or mini SD card class10
- 1x Odroid Batterie 3v Bios saver.
- 1x Fan Odroid processor cooler
- 1x Wireless dongle
- 1x Bluetooth dongle
- 1x HDMI cable to mini HDMI
############################################################################
Servos in order of my preferences for the hand:
- JX PDI-6221MG(20-36kg torque,never burned, 180degree)
- JX PDI-6225MG-300(20-36kg torque,never burned, 300degree) for the i2 Hand
- HK15298B (Strong torque 20kg , no noise, c, 90degree)
- HK15298 (Strong Torque 15kg, noisy, never burned, 90degree)
- MG996R (Low Torque 10kg, a bit noisy, burn sometimes, 180degree)
- MG946R (Middle Torque 12kg, a bit noisy, burn sometimes,180degree)
- MG995 (Low Torque 10kg, a bit noisy, burn very easily, 180degree)
These are servos I have tried. There is other servos that can fit the required size specifications. All these servos need to be set with a Min, Max within the software because their rotation in degree varies. Each finger of the InMoov hand has a different extension, retraction length.
Alternative Servos that maybe can fit:
For the hand:
- TGY-5521MDHV (24kg torque, should fit)
- RS-550MGC-HV (11.2kg torque, should fit)
- HS-311 (3.5kg torque, should fit)
- XQ-S4020D (21.5kg torque, should fit)
For bicep, shoulder and torso:
- JX Servo PDI-HV2060MG (60kg torque 180°fit good)
- Savöx SV-0235MG (35kg torque, fit)
- TS-80 Tower Hobbies giant scale(24kg torque, identical to HS805BB)
- CYS model S8218 (40kg torque, does not fit, needs adjustment, issue software with attach/detach)
- HK15338 (25kg torque, fit perfectly, needs resistors, reversed polarity)
- HS5805MG(27,5kg torque, should fit)
- FS6535M (33 kg torque, fit good)
- Ds5160 SSG (60 kg torque, should fit)
For the eyes:
- Towerpro SG91
- TowerPro SG92R
- JX PDI-1109MG
For stomach:
- JX Servo PDI-HV2060MG (60kg torque 180°fit good)
- Savöx SV-0235MG (35kg torque, do not fit needs modifications)
- TS-80 Tower Hobbies giant scale(24kg torque, identical to HS805BB)
- CYS model S8218 (40kg torque, does not fit, needs adjustment, issue software with attach/detach)
- HK15338 (25kg torque, fit perfectly, needs resistors, reversed polarity)
- HS5805MG(27,5kg torque, should fit)
- Ds5160 SSG (60 kg torque, should fit)
Preciso contribuir com este projeto. Sou designer 3d, trabalhando no momento em Rhino
Hi Paulo, I responded to you on your other posts.
“0,8mm breaded /fishing line. 200LB= 10 euros ebay”
Probably means to say braided fishing line. I doubt you are breading your fishing line, but who knows. Might taste good on a sandwhich
Yes you are correct it is braided…Thanks for pointing it out.
hello, I wanted to consult a connection of the eyes, both the right and left eyes (x, y) are connected to a single Arduino, I have a servo for each eye
Hello,
You will need to couple the servo with a “Y” connector
Hi, i printed most of the parts, now getting all the hardware together. A few questions.
First about sevos.
In Head and torso you say
2x Hitec HS805BB HEAD 4 AXIS
what you mean by head 4 axis? And if this is head and torso, dose this include the lower stomach that requires 2 Hitec HS805BB servos hacked? so in the Torso body there wont be any more of the big servos?
Also the eye mechanism, it says one 1X Camera Hercules HD but on the pictures it looks like both eyes have cameras, so dose it mean we need 2?
you can modify fpv cameras the same camera buy them on bang good way cheaper i buy al my parts at banggood
Hi
Where did you find the dimensions of the part?
Thanks
E ‘can have scripts full imoov complete with its links to the servants.
Furthermore arms possess high two Arduino to connect to the hands? Because the diagram can not connect other servants. Please someone help me to understand all the connections to use scripts. thank you in advance
Hi just an existential question before get inmoov fired
Can i use my 6V / 20A alimention to feed the nervoboard AND the arduino ( ext 6v > 20v ) , maybe the nervoboard allready feed the arduino ?
Or I need to use the 6V to feed the nervoboard and some 5V to the arduino ( same ground ) ?
tks
The Arduino boards are powered by the USB connection to your computer. The Nervo boards power the servos. Grounds are connected between the Arduino and the Nervo board(assuming you did all the weldings as in the tutorial)
Your 6V20A power supply will supply only the Nervo boards.
I hope this answers your questions.
Let me know on the community activity if you need more guidance.
Thank you . I understand now the system.
You make great things that will stay in history for sure.
My wife is afraid about what the printer is making and children say it’s soon a family member… So your humanoid is a success
hello , i finished my right hand and forarm i want to test my servos but witch one is the number 1.is it in the spot of 3 or in the spot of 2 on left or right ???
for the alim is it better to use battery or an laboratory alim ??? doese the Amp (6A) are important ?
sorry for all those questions but i’m a beginer. print all the piece wasn’t a problem but servos and arduino is an new stuff for me.
thanks for this project.
The battery has to be 6V. I use 6V12Ah batteries. The servos are mounted with the following order you will find in the Hardware map of the InMoov site in “Build Yours”
amigo cuantos días te tomo la impresión ? saludos
Wow man Gael really nice project coming from here, Thanks a lot For sharing It!
I Love this project! Will get into It 100%! Getting some servos right now!
Great!
Once you get started you can share your experience on the community!
Hey Do you have a working alternativ servo for the hs-805bb? I Need one because the hs-805bb is out of stock
Check the BOM list for the alternative servos. You might need to print complement parts.
Any link to fitting pc speakers ? i cant find the right speakers that fit the ear…
These are okay, they won’t be very strong, only 3w. if you can find with 6w it’s better.
Use also a small amplifier.
bonjour je voudrais savoir quel sont les ressource idéal en ce qui concerne la tablette ou le pc pour le inmoov de façon qui n est pas trop lent pour la réaction de travaille ?
j ai vue tablette lenovo tab 8 ,est ce que tout les tablette fonctionne a partir du moment ou elle son sous Windows ?
est ce que surface 2 ou une samsung peut suffit je ne veut pas faire de bêtise en achetant trop faible merci
Dany
Hello Dany, what is important is to get a fast processor. Surface2 will be okay. It’s hard for me to tell it will certainly work because, I haven’t tested it though. You can run MyRobotLab on Windows 7 and up, on Linux and OSX Apple.
I have an old Pentium4 Windows XP and I can run InMoov with it, so anything with a recent processor should do the job.
I only recommend the Lenovo Touchpad 8″ because it fits in my design of the back parts of the robot.
Oops désolé j’ai répondu en Anglais, c’est l’habitude…
Merci beaucoup je vais voir cela
Hello Gael,
my name is Pedro and talking from Portugal, Lisbon. I belong to a non-profit association named Hackerschool from the university IST, that work on projects from electronics, robotic, programing etc.
We are at the moment starting the inmoov project, and would like to contact you regarding, if ideologically would be a problem to obtain some help from local sponsors to pay the materials.
Would be fantastic to discuss that with you since we have no wish to disrespect in any way the inmoov community.
Thank you and great robot !!!!
pedrogilsenarego@hotmail.com
Hello Pedro,

I’m glad to hear that Lisbon is going to have an InMoov in your Hackerschool.
I have been developping InMoov since 2011 without any sponsors. I can hardly tell you how difficult it is, because I had some tough moments, I would have liked to have more filament to keep printing my progress, but I had to wait to get my pay of the month.
Still today I don’t have sponsors!! The main reason is because I don’t want them to interfere with my project, I am very difficult on that matter…
Thanks for your concern.
Let me know how your progress is doing, if I could I would sponsor you!!
Thank you for your answer!! We will update you for sure as soon as the project goes!! Great job!!
Hi Gael!
I’m commenting from Science Centre Singapore. We have just started this project and I would like to thank you very much for the comprehensive tutorials for us to follow. I am an engineer here and am using your build for internship programs here with Mechatronics students.
We also do artiste in residency here at the centre and some workshops. I was wondering if you would want to discuss about any collaborations that we could possibly have.
In any case keep up the good work!
Hello Alfy,
It’s great to know InMoov project is getting built in Singapore! Hopefully we will see your progress pictures on the community ward.
We actually need help on the programing side. As you know Myrobotlab is being developped by members and by Greg Perry, which is a LOT of work.
Any help focused on improving the InMoov services on the software is welcome!
can I use two arduino uno or do I have to use one uno and one mega ? I’m only building both arms
If you plan to build the complete InMoov, you will be best with two Arduino mega.
But since you are only building one arm without head and shoulder, just a Arduino Uno will be enough.
Hi there!
Does it exist a tab in MRL to control gestures of all the fingers at the same time (while assembly) without always attaching and de-attaching one from another?
Thanks
Hi,
No there is no tab that controls the whole hand.
But if you use a script to initiate the hand, say this one: inmoov.minimal.py.
You can write in the python window of MRL, after the script has been launched:
i01.detach()
or
i01.attach()
it will disconnect all the servos by un powering them.
Hello inmoov.
very hard to find servos on the market.Better to help servos we need new servos list.
very nice aliexpress servos category.
Waiting for help and answers
Hello, if you find other compliant servos, I will gladly add them to the list. Take the sizes, specifications and do some research and let me know.
Good morning, Mr. Geal,
First of all I sorry for the my poor english. I looked with admiration your project. I studied electronic and mechanical engineering. Now, I’m retired. For years I have read many books about robots. And finally, at your site, “ınmoov” I met with. A short time ago I made my 3D printer. Now, “ınmoov” I press the pieces. At the same time, “Arduino” on the books I read. In later times, I may need your help. I live in Turkey. It may have difficulties in finding material. Price, time, transportation etc. Later I will be my questions to you. Thanks for your help.
Best regards.
I am using HS5805MG for the 805BBs, and SG90’s for the eyes.
The SG90 are not very strong but they can do the job for a while. I have been using the SG90 in my second InMoov for about a month now and it still works fine.
The HS5805MG servos are very interesting because they can indeed replace the HS805BB. I have added them in the servo list of the BOM.
Thanks a lot for the info.
I have the hs5805 in the neck and head rotation . but they will not move 180 degrees do you know how to make them move 180 degrees ?
Hello,
You will need to add a resistor on each side of the potentiometer to fool the servo board. There is a topic about this on the InMoov forum.
Mr Gael Langevin
How would you help on various sizes of screws.?
Hi Gael,
Thanks for sending the Nervo board to Australia so quickly.
I am looking for a suitable tablet for the back. The Lenovo Thinkpad 8 is getting more outdated so I was wondering if you (or anyone else) knows of any other more recent Windows tablets which fit in the back without having to modify the inMoov.
Also, are you running the whole of your inMoov connected to the Lenovo Thinkpad using MRL? I noticed that the Thinkpad only has a single USB port. Are you connecting an 8-USB hub to the Think-pad or are you using Wifi from that one or another computer? It would help me to know exactly what you are using and if you are using two computers at the same time or whatever.
Thanks again for introducing me to the world of inMoov and robotics :~)
Hello,
That is a fact, tablets are obsolete within no time. I haven’t found a replacement tablet yet although my search was limited and brief. There is someone that recently posted pictures of his InMoov on the community page that shows another brand of tablet. The size seems to fit although the USB connector is disposed on the left side instead of under.
The Lenovo tablet runs the whole InMoov, no need for an extra PC. The unique USB port can be used to power up the tablet and to connect a self powered HUB of 8 ports to have sufficient ports for all the current devices. See the BOM page for the details.
Hello, looking at building the hand. I already have some servos from HK, however they are rated for 1.5kg/cm, while the ones you recommend are for 10kg/cm, is the 10kg/cm really necessary? I know I may need more than 1.5 but 10? Are there alternative servos I could use?
Hi,
A lot of torque is lost in the length path of the tendons. A servo with a torque of 1,5kg will maybe get the finger to move but don’t expect it to hold anything for a while, it will certainly burn out. Even the 12 kg torque (MG946)are burning out, that is why I recommend the HK15298b which have a 20 Kg torque, I never got any of those burned out.
1X Camera Hercules HD (dismantled for this purpose)
Can you suggest an alternative as these are old and hard to come by?
Thanks
Hi,
If you follow the eye tutorial, you will see that I also use another type of camera from Microsoft (LifeCam3000). The files are available for both models here: http://inmoov.fr/inmoov-stl-parts-viewer/?bodyparts=Eyes-mechanism
I have had trouble getting the Hercules Twist working on the Thinkpad 8. It doesn’t recognise it as a camera. I contacted Hercules website and they replied that it doesn’t work on windows 8 or 8.1 – the Thinkpad’s operating system. It works fine on my Windows 7 laptop.
Hello Humanoid,
The Hercules works on my two Lenovo Tablets which are both running Windows 8.1.
It all depends of your OTG and mostly the hub, I’ve had two different hubs that wouldn’t let the camera mount correctly.
Make sure you have the same hub and OTG cable as I have mentionned in the Hardware and BOM page.
OTG cables have a strict order of of connection to work properly which is discribed by the vendor.
I purchased a Lenovo Miix 2 8 Tablet running Windows 8 since they are way more available. I’ll be adding spacer blocks to adapt the existing back holder. They are 1) 2mm x 8mm x 62mm for the bottom, and 2) 6mm x 8mm x 90mm for the sides.
Here is the thingiverse file: http://www.thingiverse.com/thing:1742265
Great! How about the USB connection? Is it placed at the same place than the Lenovo Touchpad 8″?
It’s really nice to know that this tablet can be used as well.
Do I really need fishing lines as strong as 0.8 mm, 200 lb? Can I use ones that offer 80 lb?
Sure it will do the job! Mainly the issue with 80lb, is that it will slowly carve in to the plastic in the pass through holes.
hello . thanx for great progect. where i find full electric scheme .?
Hello, All electrical scheme is in the hardware and BOM page.
Hi Gael,
I am using nervo boards okay and am now installing finger-tip sensors. Is there a little break-out board for the finger sensor wires? I am already using the little hand boards for both hands for the fingers and wrists. The only extra little spare boards I can see in the kit have through-holes for connection to the main nervo board. Is this something we just sort out for ourselves?
Hi, I bought the Chuwi Hi8 pro 8 to test in the back and have found that it does not seem to work, hopefully I can save others the headache.
Here are my issues:
Windows 10
Auto update fills up all disk space, not allowing sufficient space to install MRL. With android on there only 16GB is available for windows.
Kinect
Wouldn’t activate, not sure why. Quick search showed that it could be a USB bandwidth issue.
Charging limitation
It has 1 USB C port, I cannot find a way to charge and use a USB hub at the same time. Maybe there’s a solution out there.
Battery Life
between 2 and 4 hours browsing the web. Im sure it would drain faster running MRL.
Case fit
its just too small and it would need an adapter. In addition the usb port would need a hole to go through since it connects on the side vs the bottom like the lenovo.
Overall
The tablet seems fine itself, though build quality isn’t great, but for 100 USD i wouldn’t expect the best.
Gael,
I am installing the finger sensors. Can you please tell me the value of the 8 pin 7 resistor SIP resistor you used? Also is it a Type A SIP Resistor or a Type B? I thought it would probably be a Type A. I noticed that there are many different Ohm values available for the 8pin ones.
Maybe the sensor requirements could be added to the list.
Hi Humanoid,
You need type A and pin 1 needs to be connected to GND/ground.
I don’t no yet which resistor value is the best (I haven’t the foam at home)
If you using this SIP resistor network:
When there isn’t a sensor connected, the signal to the Arduino is connected to GND by default.
Because this SIP resistor connects all Signals to the GND.
If you connect the Sensor(s) to the Plus and the Signal, there is a voltage divider created.
When the resistance from the sensor go’s lower when you pressing to the finger, the signal voltage to the Arduino go’s higher.
I think you already find out where you need to solder the SIP resistors.
Here a picture just in case:
https://www.dropbox.com/s/hvu5mqrtvj78fp1/Analog_Mega_Board.jpg?dl=0
I’m sure when the finger sensor is included by default, Gaël will include this info soon to the NervoBoard tutorial.
Regards,
Marten
Thanks Marten,
Kwatters has been helping me too on the MRL shoutbox. Maybe we can figure it out and I’ve asked Gael what he’s using. Just waiting for a response.
Cheers
Hello,
I’ve added the info about the resistor on the Nervo board tutorial.
Hello Gael
I’m a bit confused with 2 servos that show in the mechanical layout as “articulating neck” (the two ones at the side of the bigger “articulating neck”).
What do these two servos do exactly? I understand that there is one servo for “head rotation” (left/right) and I guess we need another servo in order to move head up and down, right?. But how about the other two “articulating neck”? I can’t find their function explained in any of the “build yours” page, or where do these servo locate in the 3D pieces.
I’m in need of some insight about this, i’m probably missing something in the tutorials. Thx in advance.
Those two extra servos have been added for tilting the head side to side. If you plan to do this you will need to use Bob Huston modification for my original parts:
http://www.thingiverse.com/thing:1243403
video:
https://youtu.be/FPV6k8QfDY8
Alright! Thanks Gael, I think I will skip this feature for the moment, but it’s good to know I have that possibility.
Hi, Gael.
Thanks for sharing this great project with all of us.
I am a teacher in Vocational Highschool Industrial Automation Department in Izmir,Turkey.
I started to make inmoov with my students as like as a project work.
They are very excited about this project.
We started to make fingers, hand, arms and shoulders.
My students are coming to the school even their holiday time for printing.
So we warmed our printer and it used to work without cease:)
Maybe we will have more questions in the future if you have permission.
But today I want to ask you one question about odroid U3.
Nowadays I couldn’t find it in any store in Turkey.
But I can find Odroid C2. Due to my worries about some differences that I couldn’t know,
I want to ask you about this. Is it possible to use this C2 instead of U3?
Thanks for your interest. With my best regards.
Hello, Nice to hear your student are really enjoying the project!
As you maybe saw in the Hardware map and BOM, I have abandonned using the Odroid because it is not fast enough to run the robot. Mainly the ARM processors are good for video capturing.
If you want to go Linux (as the Odroid) I would recommend going for the RasperryPI3, which will give you better results.
All together to make it more simple, I use a tablet (Windows but it can be switched to Linux as well), because it already has a screen and all functionality, like sound drivers detection, video driver detection, internet access, keyboard, touchpad mouse.
Hello Gael, need help understanding the 8 port USB hub. I bought the same 8 port USB hub, can you explain which port the tablet plugs into to charge the tablet.
I think the red port on the hub plugs into the tablet using the OTG charging cable and the female USB plugs into the front type b USB on the 8 port hub, is this correct? Do you have a picture or diagram?
Thank you,
Yes you have it correct.
Thks Gael for your great work and disponibility.
I’ve prepared the hand and forearm for my students (middle school ages 12 to 14).
Starting from september, if you don’t mind, I’ll propose my students to contact you for some hints and encouragement of course
Great!
No problem, your students can contact me via the English forum.
Hello Gael thank you for sharing such a great project!
We are from Korea and I and couple of my friends are on a school project with inMoov, planning to make just both hands and forarm parts. Here we don’t get the exact usage of the nervo board. On your page you mentioned nervo board is to connect several servos and arduinos and it seemes to be put in the head part. Does that mean we do not need nervo board for our project, just the arm parts?
Oh i searched the answer in the forum! Guess we don’t need one
Hello,
The Nervo boards and MyRobotLab work nice together and are specially designed for InMoov connections.
If you build only the hand you can use a Nervo Board kit or search the net for another servo shield. In both cases it will work.
Best regards
Hi, I am interested in mounting the HK15338 servos for the biceps and in the places that these servos are necessary, but you say that you have to add a resistance and that the polarity is reversed ….
Where to add resistance and what value ??
And to what you refer with the inverted polarity ?.
Thank you very much, it’s a great project, I love it ….
Hello,
Here is a link to a similar question in the forum:
https://groups.google.com/forum/#!topic/inmoov/oPDHvJRI4zs
And also:
https://groups.google.com/forum/#!searchin/inmoov/resistor$20servo/inmoov/ay91Yxh5AUg/k4nM4DoTiU4J
Regarding the polarity. The motor inside the HK15338 is mounted opposite than the HS805BB, therefore to follow the same initial pattern, you need to remove the motor from the casing and turn it 180 degrees before soldering back the controller board.
Hi. Cool project. We are building one in Vaasa, Finland.
What is the typical power consumption of the whole thing? I calculated that it could draw almost 400W at 6V if all the servos would stall at the same time, but I guess only a small percentage of this is necessary for the power supply. You link to a 300W 6V power supply, but perhaps a smaller one is sufficient? I am installing car fuses as well hoping to protect the servos and battery (which is sometimes used).
BTW, the “Mini amplifier 6V” link is broken.
Hello,
The 60Amps6V power supply is doing fine to power the whole robot. When using a 20Amps6V it sometimes shuts down because of peak consumption.
I think I wouldn’t go lower than 40Amps. But if you can get a higher one, it’s more secured.
Adding fuses is good. You can also add some capacitors for each servo, it helps low Amps power supply to stand the surge.
Hi, I too am building one. I am acquiring all the hardware and screws and such now. In the mean time I have my printers running at least half the day each day.
The mini amplifier appears to be the same as this one here on Amazon: https://www.amazon.com/gp/product/B076FNKTSQ/ref=oh_aui_detailpage_o02_s00?ie=UTF8&psc=1
Hope this helps.
Thanks for the comment
Hi All,
I just wanted to share a lesson learned on tablet selection. I selected the Dell Venue 8 Pro because I can find them at a reasonable price on ebay. Unfortunately it seems difficult, near impossible, to simultaneously charge and connect peripherals to the tablet. There is one suggest hack (link below) however I’m unable to locate the switching cable suggested. I haven’t been able to source the one Gael reference and cannot locate the one apparently release by Dell. Simultaneous charging seems to be a challenge with OTG in the Dell Venue.
http://www.toddklindt.com/blog/Lists/Posts/Post.aspx?ID=478
~~Open to suggestion
~Rob P.
Thanks for the feedback on that tablet.
I will mention it in the BOM list.
for the eyes do I have to put two cameras or one?
which one to use?
Hello,
one camera is enough for to do most robots can do today.
MyRobotLab with InMoov can do Face tracking, face recognition, color detection, object tracking, point tracking and so much more!
I bought two hercules cameras for the eyes.
Can I put an eye on it, that is, all are two for the eyes?
except for the eyes are no longer these DS929HV crown servo motors
so what do you advise me to use?
thank you
Hello,
In Hardware and BOM page look for the alternative servo list.
Hi, just a quick question… in the Ribbon cable section, when you say “Shoulder to Arm————————————– ribbon length 0cm”, the 0cm is a mistake? How long should it be?
Also, the connectors are all female?
Thanks very much,
Campus Tecnológico Madrid
Hey!
Yes that was a mistake…
Just fixed now.
PS: all length are different if you follow the shoulder tutorial.
http://inmoov.fr/shoulder-and-torso/
75cm and 90cm
Thanks very much, Gael!
And another quick question… except when you say “print at a high quality”, what quality should we select? 0.1mm, 0.15mm, 0.2mm, 0.4 mm or 0.6mm (these are the Cura options).
Thanks a lot,
Campus Tecnológico Madrid
hola desde Madrid,
Mira yo lo he impreso con varias BQ PRUSA I3
boquilla 0.4
calidad 0.2
Grosor de la pared 3
y depende de las piezas al 30% de relleno Rejilla
Muchas gracias, Javier!!
Una pregunta, Javier, ¿en qué sección del programa que uses, Cura, etc., pones que 3 para el grosor de la pared?
Muchas gracias!
hola a todos,
estoy en el momento de terminar de imprimir el inmoov (maravilloso proyecto del sr.gael) y necesito ayuda en saber que componentes electrónicos necesito comprar , lo digo por si alguien me puede ayudar.
un saludo desde España TUNCHIPS info@tunchips.com
Hello everyone
I am at the time to finish printing the Inmoov (wonderful project of Mr. Gael) and I need help in knowing that electronic components I need to buy, I say if someone can help me.
Greetings from Spain TUNCHIPS info@tunchips.com
Hi Gael,
Will this set work for the OTG+charging special cable for the Lenovo Thinkpad 8?
http://amzn.eu/ejKGisP
Thanks a lot,
Campus Tecnológico Madrid
Hi, I have printed and assembled the Head, Torso and Stomach. I have started the right arm (Shoulder is printed) and would like to start putting the electronics together.
I purchased the “Nervo Boards” and have them assembled and now I am waiting on servos to arrive.
I would like to go ahead with the Speakers and Sound-board, but the products linked are no longer available. Has anyone found suitable replacements? I assume the speakers mount in the ears (have not seen any detail on this), so I’m sure size is an issue. Not only diameter, but depth as well. How much room do I have to work with? What are the specification on the audio amplifier (i.e. size voltage, mounting)? Where does it mount in the system (again, i have not yet seen any detail on this in the instructions).
Thanks for the help and thanks for making this an open source project. I am excited about getting mine assembled and working.
Robert Holt
Hello,
I have fixed the links and added a picture to give the sizes of the speakers.
WOW! Thanks for the quick response, I saw that I as was scrolling down to find my post, and thought I had missed it the first time through:)
Thanks for the help. Is there a picture in the tutorial showing how the speakers are installed? What about the audio amplifier.
Robert
Hello,
The assembly of the speakers is rather simple.
You can also mount the speaker in the jaw:
http://inmoov.fr/head-3/
Regarding the amplifier, I have also updated the link. Refer to the constructor ‘s informations for the connections.
Hi Gael,
I bought alot of HK15298B servos but then later I saw you wrote in your blog : http://inmoov.fr/simpler-servo-bed/ , ” a 0 to 180° rotation like the analog MG995″ and you recommended these because the HK15298 only rotates 0 to 90 degrees…. , I’m confused now, am I supposed to order the MG995 instead of the HK15298B? ….,
Thanks much
Roger
Hello,
Thanks for reporting this.
The tutorial needed a little update.
The HK15298B are the recommended and the pulleys on the servo bed are adapted to those servo restricted rotation.
Forget the MG995, they burn too easily.
For the Hands and Forearms hardware section, it says that 10 HK15298B servos and 2 MG996r servos are needed in total.
If I were to only make one hand and forearm (either the right or the left, haven’t decided yet, but not both), would I need half of this quantity, or would I instead need double the quantity to build both?
If you are building only one hand and wrist, you will need 5 HK15298B and 1 MG996R.
That’s what I thought. Thank you for confirming.
Bonjour,
Quel câble ruban utilisez vous pour connecter les servos?
Pouvez vous donnez un site où on en trouve.
Cordialement
Bonjour,
Sur eBay par exemple.
https://www.ebay.co.uk/itm/Grey-Flat-Ribbon-Cable-1-27mm-10-14-16-20-26-34-40-Way-/263085715366
If i were to use a 0.38 mm braided line would that be okay? Or should i use a 0.8mm
Hi,
It will work, but slowly it will cut into the plastic because of it’s thinner diameter.
Hello Gael, I’m confused with the servomotor of the head, what is it? I can not find it in Spain …
The servo of the jaw is a 996r and those of the eyes also have them, I only need the one that turns the head and raise, lower and tilt the head. Thank you.
Hello,
For the jaw you need one HK15298B or some (PDI-6221MG, make sure to get 180°)
For the Neck and RotHead you need two HS805bb or some PDI-HV2060MG
For the eyes you need two SG92R or some DS929hv
For the RollNeck (tilting head sideways) you need two HK15298B or some (PDI-6221MG, make sure to get 180°)
Hello Gael and all, for the ribbon we need to order what size? The link above for “Cables” takes you to an Ebay post that offers various sizes and length. i.e. 10, 14, 16, 20, 26, 34, or 40 Way
Hello,
You need to order a 14 ribbon. The length is about 3 Meter, but take 6 Meters to be secure.
Thank you Gael! I ordered 10 Meters of colored 14 ribbon. I saw another post were you recommended the colored for helping tell what goes where.
hello Gael,
so you replaced your tablet with the 8th gen cpu mini pc?
how much voltage does this mini pc requires?
and for the robot you have 1 power supply for everything except the kinect which has rechargeable batteries?
great work and thank you
I can use both options.
The tablet alone to control the robot, but in case the yolo object recognition is in use , the tablet lacks a bit of cpu and memory.
Or I can use the 8th gen mini pc with the tablet as screen.
-One power supply for the nervo boards (controls the whole robot, main supply)
-One power supply for the hub
-One power supply for the 8th gen mini pc
-One power supply for the Kinect One (if I use the kinect 360, it goes on the main power supply)
Thank you for your reply
can you please specify the voltage for each source:
the main power supply is 7.4 V and the power supply for the 8th gen mini pc is 12V?
The main power supply is 6V60A, the power for the 8th gen mini pc is 12V
Hi
Where can I find the dimensions of the part for 3D printer?
Thanks
You can find all the parts in the gallery stl library.
To know a dimension of a part, pop the stl into Netfabb free version and you will see it’s total dimensions.
Have you considered using the STM32 based Arduino like the “blue pill” rather than the megas. lots of spare CPU cycles, small enough to place in the forearms.
what about the legs and hip
Hello, the speakers are no longer available on AliExpress.
I found those as an alternative, will they fit?
https://m.fr.aliexpress.com/item/32834511016.html?trace=storeDetail2msiteDetail&spm=2114.12010609.8148356.17.20462d3fs7GRaw&spm=a2g1y.12024536.hotSpots_49795330.0&spm=a2g0n.store_home.hotSpots_49349801.0
Found this which is a perfect replacement
https://m.aliexpress.com/item/32819139413.html?spm=a2g0n.orderlist-amp.item.32819139413&aff_trace_key=24554e281ed04049952a936f0dd87e17-1556985676726-09677-UneMJZVf&aff_platform=msite&m_page_id=8029amp-2AezNnBp-osCZ0Hqvulu-A1557026536128
Thanks for finding this new link, I will replace the old one in the page.
Hi Gael,
Lately, i am not able to find the arduino code on the site, where is it?
Also, is there any arduino code for stocmach hand,torso?
Thanks!
Doh!
They disappeared again!
WordPress is a nightmare to maintain.
You can always access them if you click on “Build Yours”.
It will open a page and on the bottom right side you can find the list of all the scripts.
where do I find the Arduino info to control the hand with a pc?
Hello,
You can find the links to Arduino sketch in the hand tutorial page.
Otherwise you control the hand with our software MyRobotLab. (see page How to install MyRobotLab)
Ok,I Have decided to start my robot,I Hope am not too late.
But am confused a little bit about the BOM,could some one help me an excel file(like all the parts to buy aside the 3d printer and the filaments to print the parts.)
thanks
Hello,
Currently the only Excel files available are for the 3D printed parts names.
Does anyone know where the finger sensor circuit board that is in the forearm go to?
Hello,
it connects to the sensor pins (A0–>A5) corresponding on the Nervo Board.
Good morning everyone. I tried to look for Miscealenous Bolts but I didn’t find it anywhere.
Can someone give me an online page to buy it? And which size of Miscealenous Bolts I have to buy? Thanks!
Hello, Have a look in the Hardware and BOM page.
Hi everyone,
I am working on the head (neck, jaw, eyes, etc.) and I have some RDS3115 servos that I was wondering if I could use for the head area.
I am also wondering if anyone has used OV7670 cameras for the eyes.
Thanks
Hello,
I haven’t heard anyone using these servos and camera yet.
Regarding the servo, compare the sizes with the HK15298B and the position of the gear shaft, to make sure it is similar.
For the camera you have difficulty using it because of the lens size, which is much too big to set within the eye.
Thank you very much for your quick response.
In the Inventory spreadsheet, HS805BB servos are described as medium-sized for the head but large elsewhere. Do they come in different sizes? because I could only find one.
Also, what other alternatives are there for HS805BB for the head?
Interesting.
Somebody shared the spreadsheet, but I never fully over looked at it.
The HS805BB comes only in large scale servo.
For the head alternative, you could look for a smaller servo, you will find some printable adapter on Thingiverse in the section InMoov derivatives.
I have used HS805BB and FS6535M, But they are creating huge noise. Any Alternative solution for Noiseless Servo Motor.
Unfortunately there is not much choice to avoid noise when using RC servos.
Hi Gael,
I placed an order for a set of Nervo Boards order #10977. Then I read that I needed two sets for a full robot build.
Can I amend my order and get you payment for the second one before you ship them out please.
BTW I live in Dept 46 (Lot)
Cheers Pete.
Hello,
Thanks for your purchase on the shop.
Yes, you can make a second order and I will send both together.
Best regards,
Gael
Greetings!
Where is the wiring diagram for the cameras, PIR & Xbox device?
FYI, I see where the PIR goes
Hello,
The camera and the Xbox 360 are USB connected to the PC or tablet via the 8 port USB hub.
I have a 12×13.5×10 cm printer. What are the components that I can print with it to make a head
Hello,
I have designed InMoov to fit a printer bed of 12x12x12cm, but some parts exceed of a a few millimiter this bed size.
You will certainly encounter difficulties to print InMoov with your 10cm Z hight.
in order to print the head alone, should i print all the parts associated with it or only the parts related to a particular version.. Basically i want to know what does the version number indicate with each part..?
what does the ‘V’ no indicate?
Hello,
“V” is Version.
so , should i print the parts related only to a particular version ?
No, you should print the parts listed in the tutorial, not taking care of the number version.
If you want to print the head alone, you will need to print all parts in this link:
http://inmoov.fr/inmoov-stl-parts-viewer/?bodyparts=Skull-and-Ears (note there is different ear options, select the proper file to print according to your choice)
http://inmoov.fr/inmoov-stl-parts-viewer/?bodyparts=Face-and-Jaw
http://inmoov.fr/inmoov-stl-parts-viewer/?bodyparts=Eyes-mechanism (note there is two types of camera, select the proper file to print according to your camera choice)
You might want to also print the Neck in order to fix the head on something:
http://inmoov.fr/inmoov-stl-parts-viewer/?bodyparts=Neck
thank you for ur response
Cześć Geal wiem, że pewnie ktoś Ciebie o to pytał ale nigdzie nie mogę znaleźć chodzi mi o sprężyny naciągowe do ścięgien czy mógłbyś mi podać kilka linków gdzie dokładnie takie mogę zamówić ? Po za tym wpadłem na pomysł aby zamiast rurek silikonowych użyć rurek antysplątanowa
https://allegro.pl/oferta/rurka-antysplataniowa-zagieta-z-kretlikiem-cormora-7693112334?utm_source=google&utm_medium=cpc&utm_campaign=_UZSD_pla_sport_turystyka_w%C4%99dkarstwo&ev_adgr=W%C4%99dkarstwo&gclid=CjwKCAjwzJjrBRBvEiwA867byvtafP37tNc0PVofW8dLsYr0bQpXpiW8l6HuoqQsNK9p5eAnJZ6tBxoCuooQAvD_BwE
można ja łatwo przyciąć do własnych potrzeb
Hello, ou can find those springs on ebay. Just make a search like this : spring (13/64″x13/16″)
In most cases, it will a box with various springs and you can select the correct one in the box.
I do not know what is anti tangle tube? Can you explain how you are using it?
jest to rurka dla wędkarzy służy do uniemożliwienia splątania się żyłki . Można ją przyciąć do własnych potrzeb odcinając oczywiście na końcu ta agrafkę i krętlik. Dałem link do takiej rurki w poprzednim pytaniu. Co do sprężyn bałem się że zakupując cale pudełko sprężyny nie będą pasować, będą za długie albo będą miały za dużą rozciągliwość
Hey Gael,
You wrote at the Point ‘Servos in order of my preferences for the hand:’
that we can use the MG996R Servos for the Hand.
But they are to high for the Servobed and the wrist.
Did you use an other Servobed or is that a mistake?
best regards Ben
The MG996R are a bit higher than the HK15298.
But it doesn’t affect the setup.
You can use the small rubber rings provided with your servos to fill the gaps.
Thanks a lot
I haven’t been able to find 0,8mm braided fishing line in 200LB strength – anyone have a link for an alternative?
I can only find 100LB in 0.8mm – and that’s braided kevlar line.
Hello,
Here get it in 250LB 0.8mm.
https://www.ebay.com/itm/300M-328Yards-Dyneema-100-Pe-Braided-Fishing-Line-6lbs-300lbs-Spider-Power-Line/200990618132?hash=item2ecbf97214:m:m1Poz6GFImr_1QPCNmUozoQ
Hello, tell me I haven’t found 0.8 mm wicker / fishing line 200LB anywhere, if anyone knows, discard the link to the product. Thanks.
Hello,
you should have a look on eBay, you will find many options there.
Also if you have a glance into the forum, there is many links available for the same product.
https://groups.google.com/forum/#!searchin/inmoov/braided$20fishing%7Csort:date/inmoov/X5ZXt8LSjgU/aDwTBWJhBwAJ
Hello, tell me, 2 pcs are used for your head. Hitec HS805BB, I did not find these servo motors, but these servos Hitec -805BB + 152g / 24.7kg / 14sec High Torque Main Servo / HS-805BB Analog Servo
https://a.aliexpress.ru/UyoCLUm
Hello,
If you cannot find the Hitec805BB, there is replacement servos in the list.
The JX-PDI2060MG is pretty sturdy and low price.
Sir..
I don’t understand this circuit connection
hola soy Guillermo, estoy imprimiendo a inmoov con una impresora casera, estoy en el interior de Bs As , argentina, por lo que no se como vendrá la mano en términos de conseguir las placas y servos, ya que mi situación económica es medio caótica. el objetivo es hacer a inmmov para poder hacerlo en una escuela, gracias! muy bueno el proyecto.
Hello,
Great, the hand has been using for thousands of projects through out the world.
I hope you can get it working as you expect and have a great time.
Dear Gael
Regarding the Power supply can we use 12V 50A instead of 6v 60A ?
Thanks
bonjour je suis nouveau dans la robotique.
j’ai regarder les fichiers stl par contre je crois qu il manque le pied.
pouvez vous me dire ou le telecharger merci
Hello RobotMakers^^
I’m bothered with the hand springs, I don’t know what to take and the ties don’t work anymore. The reference “extension spring 0.51mm diameter, 1cm length(13/64″x13/16″)” is not very clear. Should the spring be 1 or 2 cm long? And with the buckles, is it 5mm or 0.5 diameter? Thank you very much for your help!
Hey Gael,
Since you did your robot, technologies evolved and that’s the reason I’ve lot of questions regarding the actual market and technologies available.
First for the computer, I see you’re using NUC which is indeed much better now, but then what do you advice? Is a tablet yet you think a good solution or just a screen connected directly to the computer in HDMI or..? Is touch screen function useful you think? Do you have links?
About the servo, what do you think about this model: DS3218
https://www.amazon.fr/Waterproof-Aluminium-num%C3%A9rique-asservissement-voiture/dp/B01MR2UILZ
Could it be alternative to the Hitec805BB? Or would there be a problem with? Size differences issues? Which parameters to care more about?
For the Kinect, there are new 3D sensors technologies, do you yet recomment the Kinect 1 model? Isn’t the V2 better? What about interface and integration in the actual STL files available of the Chest?
For the Cameras, do you have newer more powerful and easier to find models we could use? Like the Microsoft Lifecam 5000 or…?
About Software, I saw new soft for Robots, EZ Builder, I don’t yet know it. What do you advice now regarding soft?
Thanks
hola Gael! espero estés bien, mi nombre es Guillermo estuve probando cosas en estos días en my robotlab , antes que nada te felicito por este brillante proyecto, mi idea es empezar a crear un inmmov , de momento llevo bastante impreso y estoy viendo de que manera me hago con los servomotores, soy de Argentina y aquí es todo estrepitosamente caro, de todas maneras tengo la posibilidad de recibir algunas piezas a través una persona en de Madrid, en este sentido te pregunto si se pueden enviar allí las placas nervo , o si con todo lo que ocurre actualmente es imposible, tu dirás , en caso de que puedan mandarlas a Madrid nos pondremos en contacto para ver de que manera lo hacemos, muchas gracias y mas felicitaciones .
Hello,
For some odd reason I didn’t get alerted about your message.
Sorry for the late response.
Welcome to you from Argentina, we have some other Argentinian builders in the community.
The NervoBoards are going to be for sale again around the 20th of May.
When you place your order make sure to set the the address for shipping to your friend in Spain, this way I will send directly to him.
Gracias Gael, si conocí a Astro en Myrobotlab, si en cuanto pueda me contacto con mi amigue de Madrid y te paso los datos , y ver de que modo abonar, muchas Gracias !
Which are the motherboards used?
You can find the NervoBoards on the shop, they are to be mounted on a Arduino Mega.
The Arduino Mega is then controlled by our software. You can look in the Hardware and BOM page for the type of PC ortablet, I am using to control the robot via MyRobotLab software.
i know this is and old thread.. but the new Nervo boards are just a little different from the Servo Boards … as displayed in the hardware wiring BOM.
i need to find something connected to the Nervoboards.
Mid stomach: 2x Hitec HS805BB or HK15338
can the HK15338 replace all the HS805BB?? (big price difference).
Hello,
Yes the HK15338 can replace the HS805BB. But the brushes of the motors are definitely less good quality. Avoid using them for the omoplate, because you will end up having to replace them rather fast.
Note also, that you might have to de-solder the motor from the controller board and turn the motor in opposite position in its socket for to invert the motor polarity.
THANKS!!
for the HSb05BB, I’m seeing things like 1/4 and 1/5 and Giant scale.. Do you which I should be looking for ?
for example is this link the correct servo?
https://www.girlenk.com/hitec-hs-805bb-mega-giant-scale-servo-1-5-hs805bb-hs805-bb-4
Hello,
I am getting ready to assembly the hands.. but i can’t seem to find the sensors used in the finger tips?
Hello there,
I have a probably dumb question about the servo’s. I ordered 15 or so mg 996r servo’s for the arms. However, for the biceps etc. you guys reccomend the HS805BB’s but they are a bit too expensive for me at this point since i just turned 16 so dont have that much money. Will these from Amazon work similarly? ( https://www.amazon.de/Goolsky-Wasserdichtes-Aluminiumoberteil-Einachsiges-Metallzahnrad/dp/B07FT8S623/ref=pd_sbs_21_4/257-2368255-0138943?_encoding=UTF8&pd_rd_i=B07FT8S623&pd_rd_r=c6b5aefe-74d2-4088-ac98-bf2060cb851d&pd_rd_w=mH8lY&pd_rd_wg=xvLgY&pf_rd_p=42bf0ad8-ce6f-4127-a2f0-106727020a41&pf_rd_r=50DCPCWWM6CBK0Z2T2RZ&psc=1&refRID=50DCPCWWM6CBK0Z2T2RZ ) Or does anyone have another cheap alternative. I have around €25.
I am going to start building the first hand in a couple days when i finish printing al the parts wish me luck!
Hello,
I haven’t tried the servo DS3218MG, so I wouldn’t know if they fit correctly.
But as you maybe already saw, we have a list of alternative servos in the Hardware and BOM page.
You say about the HF15338 servo ” needs resistors, reversed polarity”. Could you explain please?
Hello,
There is threads about the subject on the forum.
Here is a link:
https://groups.google.com/forum/#!searchin/inmoov/15338$20servo%7Csort:date/inmoov/oPDHvJRI4zs/fqea063QCgAJ
Hi Gael,
i want to build an Inmoov robot, and it seems like i`m the first one from Israel who is doing that for now.
The BOM list last update was 2016, any changes in this list?
Where can i start? i know that all parts can be build separately, but was is the best process/order for doing that?
Hello,
Welcome to you.
InMoov has been built by other members in Israel, there was a article in one of the official newspaper, but I can’t find back the link.
Anyway, the best is to start simple. Make the Finger Starter
Hi, for the Audio ampli, TDA2030A, whatever the power supply I use, I’ve the 50Hz noise perturbating the output and there’s noise on the speaker important. With battery I don’t have this but I wanted to use only power supplies. From the big Power supply 6V too I’ve this. And at the last attempt to use with a 12V DC 1A, the Capa C1 was blowing out quickly. Has someone an alternative or idea to isolate from noise? Thanks.
Hello,
You will need to use a noise filter for cars audio system.
Do you have a link or reference example of ? Thanks
sorry, I don’t.
But I remember it was a subject on the forum and different models were proposed.
You will need to investigate the forum.
Hi, I bought SIP resistor of 100K, 8 pins, but the first question is that on the corresponding boards MdG-RC, the place seems for a 9 pins component…? Then the ones I’ve are isolated, meaning going 2 pins by 2 pins and without a common ground reference, is it ok? Thanks for your lights on this matter
Hello,

SIP Resistors can be set as pull up or pull down. This is the reason you have 9 holes instead of 8.
Solder them as show on the tutorial:
hi im looking at getting the ribbon cable ,what pitch do you recommend 2.54?
Bonjour
Je suis un ancien mécano en retraite , j’ aime bricoler.
Je trouve ce site génial , je vais commencé par acheter une imprimante 3 D que pensez vous de cette marque ? (Creality Ender-3 Pro) .
J’ ai des connaissances en électricité et en micro ce qu’il me manque c’est savoir faire de la programmation mais je ne suis pas inquiet il y a beaucoup de forum pour ca .
Encore merci pour ce site qui est très passionnant Bravo
Bonjour et bienvenue,
Je ne saurais vous conseiller une imprimante en particulier. Personnellement je prefere les imprimantes a caisson fermees, car elles permettent de maintenir l’impression a une certaine temperature ce qui evite le warping. Surtout avec les impressions en ABS, que je recommande plus que le PLA, meme si c’est plus complique a mettre en oeuvre, car facile a poncer, limer, et coller/reparer a l’acetone.
Buon giorno Gael sostituti dei servo HK15298B ? sono introvabili Grazie
Buon giorno Gael sostituti dei servo HK15298B? sono introvabili Grazie
Hello,
You can find a list of other possible servos to replace the HK15298B in the Hardware and BOM page.
I recommand the JX-PDI.
grazie
Hello, are the servos rolling slave, rolling master, mid slave and low slave connected to the pins that are next to the servos that are next to them?
Hello, have a look at the map, normally you should see where these servos are connected.
https://inmoov.fr/wp-content/uploads/2013/12/Map-ConnectionsV2-719×1024.jpg
ok
ok
Hello,
Are you currently powering the NUC using a battery or a power supply?
Are you also using a DC to AC converter between the power supply/battery and the NUC? If that’s the case, what are the specs of the converter?
Thank you in advance,
Hello,
My NUC is powered by a wall outlet. I haven’t tried powering with a 12V battery to check if it works.
Hola amigo Gael soy un fan tuyo me agrada tu proyecto, soy de Peru y quisiera saber si puedo imprimir las piezas con PLA con mi impresora Ender3pro, mi consulta es con que porcentaje de relleno podria trabajar para imprimir todas las piezas, muchas gracias de antemano, soy aficionado a la robotica y quisiera hacer funcionar el inmoov!!
Bonjour j’ai une petite question sur les servos moteur HK15338, sur les résistances a polarité inversée : je les mets ou et quesque je dois mettre ? et pour le potentiomètres quand je le tourne d’un coté mon servo moteur tourne d’un coté et inversement, cependant a peut près au milieu du potentiomètre le servo s’arrête est ce normal ?
Dans l’attente de vos réponse.
Merci par avance.
Ludwig
Bonjour,
Avez-vous résolu vos questions? Bizarrement je n’avais pas vu votre post.
Bonjour Gaël, disons que le site c’est dernier temps a beaucoup merder, donc ne t’inquiète pas ce n’est pas grave pour ma part.
Alors dans le coup j’ai acheter les JX-Servo.
Mais je rencontre toujours des problèmes car j’essai de faire le biceps et sa rotation, mais je n’arrive pas a faire fonctionner mise a part faire de la casse mdr : quand je fais les branchements et l’active (enable) en faite il s’arrête jamais et va trop loin.
– Le point zéro du potentiomètre c’est quand le servo moteur s’arrêtes, au moment où il peut changer de sens de rotation, ca représente également le point repos du biceps quand il est pas activé bras en bas “position 5%” (j’ai beau regarder les tutos je ne comprend pas) ?
Merci par avance.
hallo iedereen ik ben Danny en woon in Belgiè ben nieuw hier op deze site.
ik vind dit een fijn onderwerp en ben al bezig met onderdelen te printen met anet a8 plus en deze werkt prima
Hello and welcome,
You might want to join our discussions on discord.
https://discord.gg/9qXh7fKnUQ
This is all great and incredible work! And you have done amazing things with the servos and parts that are available on the market.
In future versions, is there any consideration for using servos that are made for higher-power projects or prosumer uses, such as the MDrive, Clearpath, Dynamixel, or closed-loop stepper/servos (which should have standard NEMA sizes)? Those should deliver more power, which may be useful in the shoulders or torso. And they should provide a stronger and more stable output shaft, and that should provide more stability for the joint.
I hope to start printing and making one of these robots in the near future. If I get the chance to customize any parts for fitment of those servos, I’ll be happy to share them. And if that aligns with your plans for the project, that would be great.
Thanks again!
Hello and Welcome,
Thanks for your comment.
Some builders have modified the shoulder parts and bicep to adapt step motors, but I haven’t seen feedback on their progress.
You might want to join our discussions on the official discord server.
https://discord.gg/9qXh7fKnUQ
Hello Gael,
I apologize for my limited English skills. I have a small question. I am currently working on a robot that controls Fingers, Wrists, biceps, omoplate, rotation, and shoulders. Would I only need to use one power supply, two Nervo boards, two Arduino Megas, and the necessary servos? Do I need anything else? Would I need a USB 3.0 Hub with 8 ports and the Lenovo tablet (I intend to control InMoov via my phone)?
Thank you in advance, and I wish you a wonderful day!
This message is automatically translated
Hello,
Yes you would need one power supply, two Nervo boards, two Arduino Megas, and the necessary servos. USB 3.0 Hub with 8 ports and a PC (the Lenovo tablet is not available anymore and too old for to support the latest Myrobotlab software.)
bonjour
bonne anée 2025 merci de m’avoir accepter parmi vous je me lance dans la conception de inMoov je voudrai savoir si je peut investir dans l’achat de deux Arduino R4 wifi Bluetooth pour la conception avez vous une ref pour les hp et les deux camera (alixepress )
cordialement
laurent
Bonjour et bienvenue,
Vous trouverez les références de caméra ainsi que les speakers dans la section HEAD AND TORSO de cette page.
En ce qui concerne la construction de la tête, Il y a désormais la nouvelle version avec peau en silicone, (i2Head) peut-être ne l’aviez vous pas vu. L’arduino R4 wifi n’a pas assez de pins pour supporter tout les servo moteurs necessaires au robot complet. Il faudrait la même chose mais en version Mega Arduino wifi.(x2)